Disk Cleanup Checklist: 10 Essential Steps
Disk Cleanup Checklist: 10 Essential Steps
PC Maintenance
Jul 20, 2025
Learn essential steps for effective disk cleanup to free up storage space, improve performance, and maintain your PC's health.
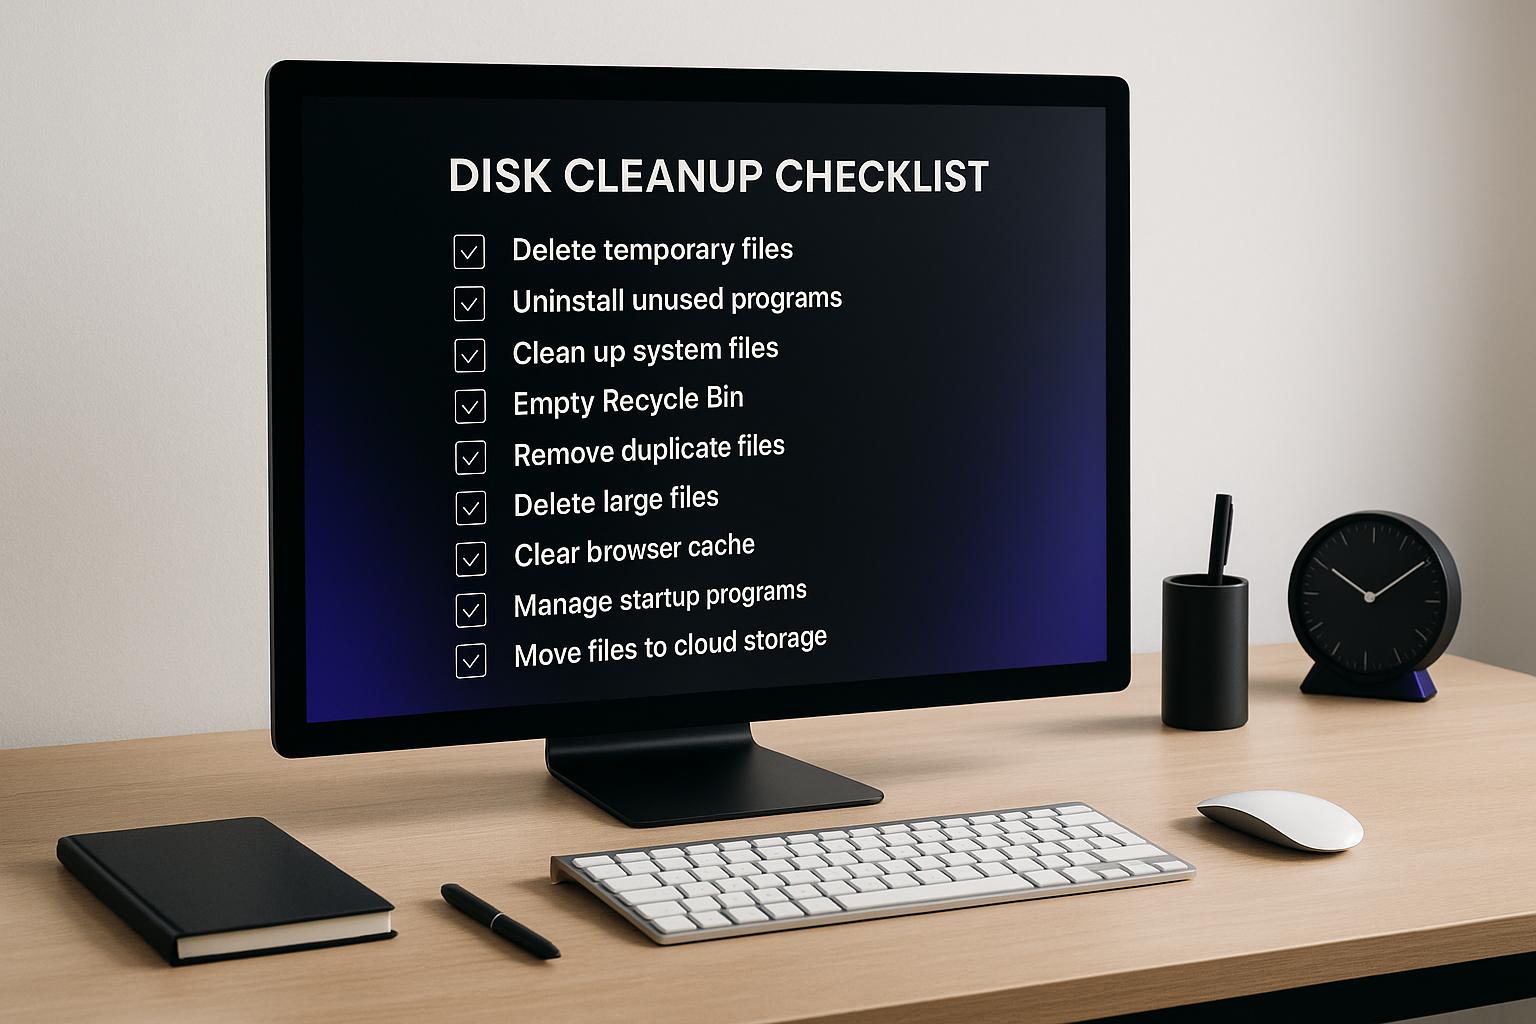
Is your computer running out of space or slowing down? Regular disk cleanup can free up 5 to 20 GB of storage and even boost boot times by up to 30%. Here's a quick breakdown of how to clean up your disk effectively:
Back up important files: Use the 3-2-1 rule to protect critical data before cleanup.
Check disk space: Identify which drives are nearly full using Windows Storage settings.
Uninstall unused apps: Remove programs you no longer use to reclaim space.
Clear temporary files: Use Disk Cleanup or Storage Sense to delete unnecessary system files.
Find large and duplicate files: Use tools like File Explorer or specialized software to locate space hogs.
Organize your files: Create folders and rename files for better structure.
Enable Storage Sense: Automate cleanup tasks like emptying the Recycle Bin.
Archive old files: Move rarely used data to external drives or cloud storage.
Check disk health: Use CHKDSK and SFC to fix errors and maintain performance.
Update software: Keep Windows and apps current to avoid storage issues.
Preparation and Assessment
Before jumping into disk cleanup, it’s smart to take a step back, assess the situation, and put safeguards in place. Think of this as laying the groundwork before making any major changes to your system.
Back Up Important Files
Data loss can happen during cleanup. While most disk cleanup tools are safe, there’s always a chance something could go wrong - files might be deleted by mistake, or system changes could cause unexpected issues. A backup ensures you don’t lose anything important.
"Having a plan to back up your data is one of the most important processes to protect the data in the event of a cyber attack." - UpGuard [2]
A tried-and-true method is the 3-2-1 backup rule: keep three copies of your data, store two locally on different types of media, and have one copy off-site [2][3]. This strategy protects against hardware failures, accidental deletions, and even ransomware attacks.
Focus on your most critical files - things like important documents, family photos, and work projects [3]. You don’t have to back up everything, just the stuff you can’t replace. For especially important files, consider backing them up multiple times a day [3].
For backups, external hard drives are great for large amounts of data, while cloud storage offers automatic, off-site protection. Set up automatic backups and test them periodically to make sure they’re working.
Once your data is safely backed up, it’s time to take a closer look at your disk usage.
Check Available Disk Space
After securing your data, it’s crucial to understand how your storage is being used. This step helps you prioritize what to clean up and gives you a realistic idea of how much space you can recover. Windows makes it easy to check your disk space using File Explorer.
Open File Explorer and click on “This PC” in the left-hand menu. Under "Devices and drives", you’ll see all your storage drives, along with indicators showing how much space is used and how much is free [1]. Focus on drives that are nearly full, as they’ll benefit most from cleanup.
For more detailed information, head to Windows Storage settings. Go to Settings > System > Storage to see a breakdown of how your space is being used. Files are categorized by type - temporary files, apps, documents, pictures, and more [4]. Clicking on a category gives you specific details and cleanup suggestions.
If you have multiple drives connected, use the "Storage used on other drives" option to get insights for all of them, not just your main system drive [4]. This is handy if you’re using external hard drives or other storage devices.
Windows also provides cleanup recommendations, analyzing your system and suggesting files you can safely remove [4]. These might include temporary files, large unused files, or apps you rarely use.
With this information, you can identify which drives need the most attention.
Identify Drives Requiring Cleanup
To make your cleanup process efficient, focus on the drives that need it most. Not all drives require the same level of attention, so prioritize those showing unusual storage patterns or nearing capacity.
Look for drives with unexpectedly high usage. For example, if a drive that’s usually half-empty is suddenly full, it could be due to unnecessary files piling up - like temporary files generated by a program or large files accidentally stored there.
Don’t forget about external drives and network storage. Over time, these can become cluttered with old or redundant files, making them harder to manage. If you use external drives regularly or for backups, include them in your assessment.
Keep in mind that Windows reserves some space for critical system operations, so not all "used" space is removable. With a clear understanding of your storage, you’re ready to tackle the cleanup process.
Removing Unnecessary Files and Programs
Now that you've taken stock of your storage situation, it’s time to reclaim some space. The main culprits? Unused programs, temporary files, and those forgotten large files that have been sitting idle for months - or even years. With your storage assessed and priorities in order, focusing on these areas can free up space without affecting your system's performance.
Uninstall Unused Programs and Apps
Unused programs don’t just hog disk space - they can also slow down your system. Some applications take up several gigabytes of storage while rarely, if ever, being used. Removing these programs can free up space, improve performance, and even make maintenance more straightforward.
The easiest way to start is through Windows Settings. Open the Start Menu, navigate to Settings > Apps > Installed apps, and review the list of programs. You can sort them by size to quickly identify the largest ones. If you spot something you no longer need, click on the app and select Uninstall.
For older programs or a more detailed overview, the Control Panel is another option. Search for "Control Panel" in the taskbar, open it, and go to Programs > Programs and Features. This view provides additional details like installation dates and software versions, which can help you identify outdated or unnecessary programs. Right-click on any program and select Uninstall to remove it.
Some applications can be stubborn to uninstall. If that happens, try closing the program via Task Manager or booting into Safe Mode to remove it. For an even smarter approach, Diskify’s AI can analyze your usage patterns and file access history to recommend programs that are safe to delete.
Clear Temporary and System Files
Temporary files tend to pile up during regular use, taking up space long after they’ve served their purpose. Regularly clearing these files can recover space and improve your system’s efficiency.
Windows Disk Cleanup is a built-in tool that simplifies this process. Search for "Disk Cleanup" in the Start menu, choose your main drive, and let the tool scan for deletable files like temporary internet files, setup logs, thumbnails, and even Recycle Bin contents. For deeper cleaning, click Clean up system files (admin privileges required) to target Windows Update leftovers, old installations, and other large system files.
For an automated solution, enable Storage Sense under Settings > System > Storage. This feature can automatically delete temporary files and empty the Recycle Bin on a schedule you set.
If you prefer manual control, open the Run dialog (Windows + R), type %temp%, and press Enter to access your temporary files folder. Select all files (Ctrl + A) and delete them. If some files are in use and can’t be removed, a quick system restart might help. Also, don’t forget to clear your browser’s cache, cookies, and history - this not only frees up space but also protects your privacy.
Delete Large and Duplicate Files
Large files are often hidden in plain sight, quietly taking up valuable storage. Old videos, unused downloads, and bulky installers are common offenders. To find them, use Windows File Explorer’s search function. Type size: in the search bar and choose a size range like "Gigantic (>128 MB)" to locate the biggest files on your drive.
For a more visual approach, tools like Diskify provide detailed breakdowns of your storage, making it easier to spot the largest files and folders at a glance.
Duplicate files are another sneaky space-waster. These can show up when files are copied between folders, downloaded multiple times, or poorly organized backups are created. Specialized tools can identify duplicates by analyzing file contents instead of just names, and some even detect similar photos that aren’t exact matches.
"WizTree is my go-to program when it comes to finding large files on Windows to free up disk space... super easy to use, lightning fast..." - Martin Brinkmann (ghacks.net)
Before deleting any files, always review them carefully. Just because a file is large - or duplicated - doesn’t mean it’s safe to remove. Check details like its location and last modification date. If you're unsure, move the file to a temporary folder first. Once you’re confident it’s not needed, you can delete it permanently.
Diskify’s AI can also help identify unnecessary large files by analyzing file types, usage patterns, and storage locations. This gives you the confidence to clean up your drives without accidentally removing something important.
Organizing and Automating Storage Management
Once you've cleared out unnecessary files, it's time to set up a system that keeps your storage organized and efficient. By combining smart organization with a bit of automation, you can save yourself hours of future cleanup while keeping your disk clutter-free.
Organize Downloads and Documents Folders
After decluttering, focus on organizing your remaining files to ensure long-term efficiency. The Downloads and Documents folders are often the biggest culprits for accumulating random files - everything from software installers to stray screenshots tends to pile up here. A little structure can make these folders easier to navigate and improve your overall storage management.
Start by creating a clear folder hierarchy tailored to your needs. For example, you might have main folders like "Work", "Personal", and "Projects", with subfolders under each for more specific categories like "Reports", "Invoices", or "Correspondence." Before diving into organization, delete or archive anything outdated, duplicated, or unnecessary to avoid wasting time on files you no longer need.
Use consistent naming conventions to make files easier to find. Including dates in the YYYY-MM-DD format can be especially helpful. For instance, instead of "Meeting Notes.docx", a file named "2025-07-20_Team-Meeting-Notes_v1.docx" is far more searchable and avoids confusion when multiple versions exist.
To streamline your workflow, consider changing the default download locations in commonly used apps like Chrome, Firefox, WhatsApp, Slack, or Telegram. This way, files are automatically sorted into appropriate folders as soon as they're downloaded. Additionally, schedule a monthly check-in to tidy up misplaced files and tweak your folder structure as needed.
Enable Windows Storage Sense
Windows Storage Sense is a built-in tool that can automatically clear up disk space by deleting temporary files, emptying the Recycle Bin, and managing cloud storage. Since it’s not enabled by default, you’ll need to turn it on and configure its settings.
Here’s how to get started:
Go to Start > Settings > System > Storage.
Toggle Storage Sense to On.
Click on Storage Sense to access its detailed settings.
Under "Run Storage Sense", select how often it should operate. A weekly or monthly schedule strikes a good balance between automation and manual control. You can also fine-tune its cleanup settings:
Set the Recycle Bin to automatically delete files after 30 days.
Configure the Downloads folder to remove files that haven’t been opened in 30 to 60 days.
Adjust cloud storage settings to make OneDrive files online-only after 30 days of inactivity.
Setting Category | Recommended Configuration | Notes |
|---|---|---|
Run Storage Sense | Weekly or Monthly | Balances automation with user control |
Recycle Bin Cleanup | 30 days | Provides enough time to recover accidentally deleted files |
Downloads Cleanup | 30–60 days | Prevents loss of recently downloaded files |
Cloud Content | 30 days | Makes inactive OneDrive files online-only to save local storage |
Keep in mind that Storage Sense primarily works on your system drive (C:) and requires you to be signed in and online for at least 10 minutes to function. This ensures it runs during regular usage and doesn’t slow down startup or shutdown processes.
Once you’ve set up automated cleanups, you can shift your focus to archiving older files.
Archive or Move Old Files
Archiving is all about keeping your primary drive free for frequently used files while relocating older or less-accessed data to external storage or the cloud. This keeps your system running smoothly while ensuring older files are still accessible when needed.
Start by identifying files you rarely use, such as completed projects, outdated documents, old backups, and unused software installers. Move these to external drives or cloud storage, but keep the same folder structure you use locally. This consistency makes it easier to retrieve files in the future.
Test your archives periodically to ensure the files are accessible and intact. Tools like Diskify’s AI-powered semantic categorization can help analyze your data and suggest logical groupings based on file content and usage patterns, minimizing the risk of archiving something you still need.
For long-term archiving, use open file formats and include detailed metadata for each file. This ensures compatibility with future software and makes it easier to locate specific files when you need them.
Advanced Optimization and Maintenance
Once you've tackled the basics of cleanup and organization, it's time to shift your focus to long-term strategies for maintaining your storage system's performance. Advanced techniques go beyond surface-level fixes, addressing the overall health of your system and setting up tools to prevent future problems. These steps build on earlier efforts, ensuring your system stays efficient over time.
Check Disk Health and Repair Errors
Over time, file system errors and bad sectors can sneak in unnoticed, potentially leading to data loss or crashes. Regularly checking your disk's health can catch these issues early and help avoid bigger problems.
Windows offers built-in tools to diagnose and repair disk issues. The CHKDSK (Check Disk) utility identifies corrupted files, file system errors, and bad sectors, then attempts to fix them. To use it, open Command Prompt as an administrator and run chkdsk /f C: to repair errors. If you suspect physical damage, try chkdsk /r, which goes further by locating bad sectors and recovering readable data. Keep in mind, the tool may require a system restart if files are currently in use.
For system file corruption, the System File Checker (SFC) tool works alongside CHKDSK to scan protected system files and replace any damaged ones with cached versions. To run this, type sfc /scannow in an elevated Command Prompt.
CHKDSK Exit Code | Meaning |
|---|---|
0 | No errors detected [5] |
1 | Errors found and corrected [5] |
2 | Disk cleanup performed or skipped (if /f was not specified) [5] |
3 | Errors not fixed or disk check unsuccessful [5] |
Additionally, many modern drives come equipped with SMART (Self-Monitoring, Analysis, and Reporting Technology), which continuously monitors drive health. This feature can provide early warnings about potential failures, giving you time to act before a problem escalates.
Update Windows and Software
Keeping your system updated is vital for maintaining security, performance, and efficient disk management. While Windows 10 and 11 handle most updates automatically, it's wise to manually check for updates to ensure nothing critical is missed.
To check for updates, navigate to Start > Settings > Windows Update > Check for updates. If updates are available, select Download & install, then restart your device when prompted. Optional updates, such as driver enhancements or new features, can be reviewed under Settings > Windows Update > Advanced options > Optional updates.
Updates require available disk space, so if you encounter space warnings, consider clearing temporary files or moving data to an external drive before proceeding. You can also schedule restarts at a convenient time by going to Start > Settings > Windows Update > Schedule the restart.
With Windows 10 support ending in October 2025, now might be a good time to upgrade to Windows 11 if your hardware allows. The newer operating system introduces better storage management tools and improved cloud integration, making it a smart choice for ongoing optimization.
Use AI-Powered Tools for Ongoing Optimization
While manual cleanup and built-in tools address immediate needs, AI-powered solutions can take your storage management to the next level. These tools analyze how you use your storage and provide tailored recommendations for keeping things running smoothly.
For instance, Diskify uses AI to study your file usage and storage habits, offering optimization suggestions you might not think of on your own. It includes features like semantic folder categorization and natural language search, enabling you to group files logically and find what you need using descriptive terms instead of exact file names.
The tool also provides detailed storage analyses, helping you identify which file types take up the most space or which folders are growing the fastest. Its visual sunburst charts make it easy to spot large files and folders that could be cleaned up or archived.
Over time, these AI-driven recommendations adapt to your habits, offering increasingly personalized advice to help you tackle storage challenges and keep your system performing at its peak.
Conclusion
Following these 10 steps can help improve Windows performance while keeping your storage well-organized. A mix of preparation and assessment, removing unneeded files, organizing storage, and using advanced optimization tools ensures your system remains fast and efficient.
"By using Disk Cleanup, you can optimize the performance of your computer by removing unnecessary files that are taking up space on your hard drive. This can help improve the overall speed and responsiveness of your system, as well as free up storage for new files and applications." - Lenovo [6][9]
Regular maintenance not only prevents system crashes and extends the lifespan of your drives but also protects your privacy by clearing cached data [7][8]. Cleaning up before performing backups ensures you're saving only what’s necessary, making the process quicker and more cost-effective [7]. These advantages highlight the importance of both immediate and ongoing system upkeep.
Windows tools like Disk Cleanup, Storage Sense, and CHKDSK are great for basic maintenance. For a more refined approach, AI-powered tools like Diskify can help organize files better and uncover hidden storage issues.
Consistency is the secret to success. As mentioned earlier, regular maintenance keeps your system running smoothly. Perform these cleanup tasks monthly or every few months to keep things in top shape [6][9]. Automating cleanups can save time, but always double-check files before deleting anything to avoid losing important data [6][8][9].
"Regular disk cleanup and optimization are crucial for keeping your Windows PC running efficiently, protecting your privacy, and extending the life of your hardware." - Riley, Glarysoft [10]
FAQs
What is the 3-2-1 backup rule, and why should you follow it before cleaning up your disk?
The 3-2-1 backup rule is a straightforward approach to keeping your data safe. Here’s how it works: maintain three copies of your data - your original file and two backups. Store these backups on two different types of media (for instance, an external hard drive and a cloud storage service). Additionally, make sure one of these copies is kept off-site to protect your data from events like theft, fire, or other physical damage.
Sticking to this rule is especially important before starting a disk cleanup. By backing up your essential files, you can move forward with the cleanup process without worrying about losing something important.
How do I set up Windows Storage Sense to automatically clean up my disk space?
How to Set Up Windows Storage Sense for Automatic Disk Cleanup
To enable Windows Storage Sense and automate disk cleanup, head to Settings > System > Storage. Once there, toggle on Storage Sense. You can then customize its settings to fit your needs - choose how often it runs (daily, weekly, or monthly) and specify what it should clean up, such as temporary files or items sitting in the Recycle Bin.
Turning on Storage Sense helps you keep your system running smoothly without the hassle of frequent manual cleanups. It’s a straightforward way to free up space and maintain your computer’s performance.
What are the advantages of using AI-powered tools like Diskify for managing and optimizing disk space?
AI-powered tools like Diskify make managing your storage a breeze by automating everyday tasks. From spotting and clearing out unnecessary files to using smart algorithms that anticipate your future storage needs, it ensures your system stays efficient without the hassle.
By cutting down on manual work and reducing the chance of mistakes, Diskify saves you time and keeps your storage tidy. It's a straightforward, dependable way to keep your system performing at its best.
Related posts
Diskify

© 2025 Prism19 Inc. All rights reserved.
All media logos are the intellectual property of their respective copyright and/or trademark holders.
Diskify® is a registered trademark of Prism19 Inc.
Diskify
© 2025 Prism19 Inc. All rights reserved.
All media logos are the intellectual property of their respective copyright and/or trademark holders.
Diskify® is a registered trademark of Prism19 Inc.